

Nothing ruins a great cosplay photo faster than a slipping hairline, visible bobby pins, or a wig that slides off your head. Whether you’re wearing a short spiked crop or a heavy, long ponytail, securing your wig properly is the foundation of a comfortable, stress-free convention.
Here is your step-by-step guide to prepping your natural hair, choosing the right cap, and locking your wig in place so it stays.
1. Prep Your Natural Hair
The secret to a flat, seamless wig installation starts beneath the cap. You need to flatten your hair as close to your scalp as possible in order to avoid odd lumps and prevent the wig from shifting.
- For Short Hair: Slick hair away from the face using a gel, or hairspray.
- For Medium to Long Hair: Many will braid two to four tight braids close to the scalp. Wrap the ends around the back of the head and pin them flat along the nape of theneck.
- For Thick or Curly Hair: Divide the hair into multiple smaller cornrows or flat twists. Keep the bulk at the base of the neck as flat as possible.
2. Choose and Secure the Right Wig Cap
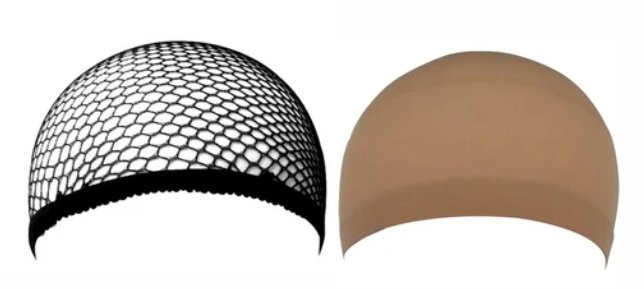
Wig caps keep your natural hair contained, provide traction for the wig, and protect your scalp from itchy synthetic fibers.
- Mesh/Fishnet Caps: Best for long, thick, or heavy natural hair. The wide grid allows you to insert bobby pins directly through the cap and into your natural hair to lock everything down.
- Nylon/Stocking Caps: Ideal for short hair or sensitive scalps. They provide a smooth surface and keep stray hairs completely hidden, though they offer slightly less grip for heavy wigs.
Once your cap is on, use bobby pins or snap clips around the perimeter—placing them right behind your ears, at the forehead hairline, and at the nape—to secure the cap directly to your prepped hair.
3. Adjust the Internal Straps
Most synthetic cosplay wigs come with built-in elastic straps and hooks along the inner nape band.
- Find Your Fit: Before putting the wig on, adjust the hooks into the fabric loops inside the cap.
- Avoid Over-Tightening: The wig should feel snug and secure, not tight enough to cause a headache. If the wig rides up at the back during movement, the straps are either too tight or the wig is too small.
4. The Correct Way to Put On Your Wig
Avoid pulling a wig straight down over your head like a hat—this pushes your hairline back and messes up your prepped hair.
- Hold the wig by the the back edge near the adjusters.
- Tilt your head forward slightly and anchor the front edge of the wig right above your eyebrows.
- Pull the back of the wig down over your head until the nape band sits comfortably at the base of your skull.
- Slide the front hairline back to align with your natural hairline.
- Locate the ear tabs (the small stiff flaps on either side) and adjust them so they sit flat and level in front of your ears.
5. Lock It Down
For heavy, styled, or long wigs, relying solely on elastic straps isn’t enough. Use these anchoring methods to keep your wig immovable:
- Bobby Pins & Hairpins: Slide bobby pins through the wig lace/wefts, through the wig cap, and into your prepped hair. Focus on four key anchor points: both ear tabs, the top center of your forehead, and the nape of your neck.
- Toupee Clips / Snap Clips: Sew 3–4 small metal wig clips into the front and sides of your wig cap. They snap directly into your natural hair for maximum security.
- Spirit Gum or Pros-Aide: For lace-front wigs or deep hairlines, apply a thin layer of skin-safe cosmetic adhesive or spirit gum along your forehead. Press the lace into the tacky glue using a damp cloth or sponge until set.
Proper prep takes a few extra minutes in the hotel room, but it guarantees your wig stays comfortable, secure, and camera-ready all day long!